Overview
I'll walk through what server actions are, with an example.
Server Actions
Server actions are a really powerful Next feature that lets you do form mutations (create, update, delete). With server actions, you can define async functions right inside your components, without creating an API endpoint.
To use server actions, you need to add the following setting inside your next.config.js file:
module.exports = {
  experimental: {
    serverActions: true,
  },
};
Handling Forms with Server Actions
Let's build a very simple todo app and get a feel for how server actions work.
Project Setup
First, create a Next app in a directory.
npx create-next-app@latestTo keep the app simple, I'll use prisma and sqlite.
npm install prisma --save-dev
npx prisma init --datasource-provider sqlite
Once the installation is done, define a prisma schema for the todos.
generator client {
  provider = "prisma-client-js"
}

datasource db {
  provider = "sqlite"
  url      = env("DATABASE_URL")
}

// 투두 스키마
model Todos {
  id        Int      @id @default(autoincrement())
  title     String
  createTododAt DateTime @default(now())
}
Now that the schema is defined, push it to the actual database table with the following command.
npx prisma db pushNext, create the prisma instance that the app will use.
import { PrismaClient } from "@prisma/client";

declare global {
  var prisma: PrismaClient | undefined;
}

const client = globalThis.prisma || new PrismaClient();

if (process.env.NODE_ENV !== "production") globalThis.prisma = client;

export default client;
If an instance already exists, we reuse it, and if not, we create a new one.
Defining the UI and Server Action
Now let's write some real code and look at server actions.
First, remove the boilerplate code in app/page.tsx and add the UI for the form.
import { createTodo } from "@/action";

const page = () => {
  return (
    <section className="px-16 py-12">
      <div className="container mx-auto flex flex-col gap-8">
        <h1 className="text-lg text-gray-900">Todos</h1>
        <form action={createTodo} className="flex max-w-sm flex-col gap-4">
          <input
            type="text"
            name="title"
            className="rounded-md border border-slate-300 px-2 py-1 outline-none"
            required
          />
          <button className="rounded-md bg-slate-300 py-2 hover:shadow-sm">
            submit
          </button>
        </form>
      </div>
    </section>
  );
};
export default page;
The important part of the code above is the form tag's action.
Instead of submitting the form with a click or submit event like in regular React, server actions use the form's action to send the form data to the server.
Here, <form action={createTodo}> receives a FormData object as its data.
With FormData, you don't need to grab input values with useState or useRef like before. You can just get them with the formData.get(name) method.
Now let's define the server action for creating a todo.
To define a server action, you need to add the
"use server"directive. You can write it inline at the very top of a function body, or split the actions out into a separate file and put it at the top of that file.
I'll create a separate file for the actions and manage them there. Add "use server" at the very top of the file.
That way, you don't have to go through the hassle of adding the directive to every single function.
"use server";
import client from "@/lib/prisma";

export const createTodo = async (formData: FormData) => {
  const title = formData.get("title") as string;

  await client.todos.createTodo({
    data: {
      title,
    },
  });
};
Using the input's name attribute and the get method, we grab the input's title value.
Next, let's create a getTodos function that fetches the todos we've added.
// ...

export const getTodos = async () => {
  const todos = await client.todos.findMany();

  return todos;
};
Now let's add the UI that shows the todos. Since Next uses server components by default, we can handle async work right inside the component itself.
import { createTodo, getTodos } from "@/action";

const page = () => {
  const todos = await getTodos();

  return (
    <section className="px-16 py-12">
      <div className="container mx-auto flex flex-col gap-8">
        {/* ... */}

        <ul className="max-w-sm">
          {todos.map((todo) => (
            <li key={todo.id} className="mb-4 flex justify-between">
              {todo.title} <DeleteButton id={todo.id} />
            </li>
          ))}
        </ul>
      </div>
    </section>
  );
};
export default page;
Now let's try adding a todo with the server action.
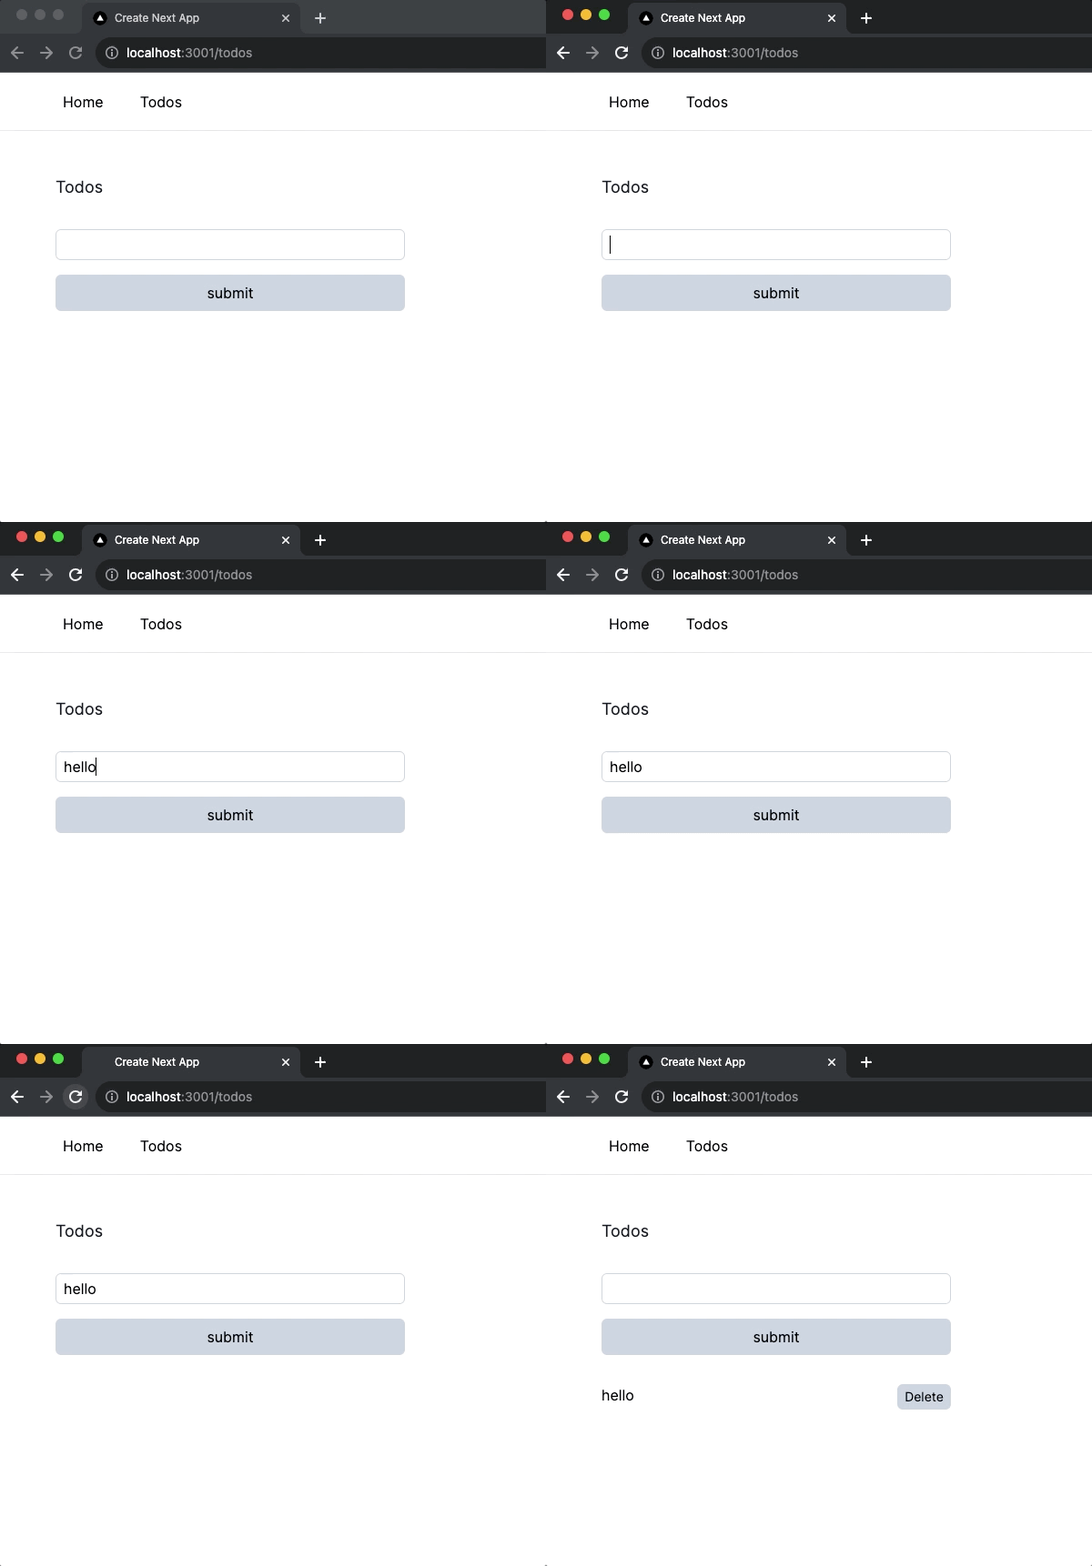
Did you spot a few things that could be better? Here are the improvements we can make to give users a nicer experience:
1. Invalidate the cache with data revalidation instead of refreshing
The easiest way to revalidate data is revalidatePath, which invalidates the entire route segment.
In the createTodo function, add revalidatePath.
"use server";
import client from "@/lib/prisma";

export const createTodo = async (formData: FormData) => {
  const title = formData.get("title") as string;

  await client.todos.createTodo({
    data: {
      title,
    },
  });

  revalidatePath("/todos");
};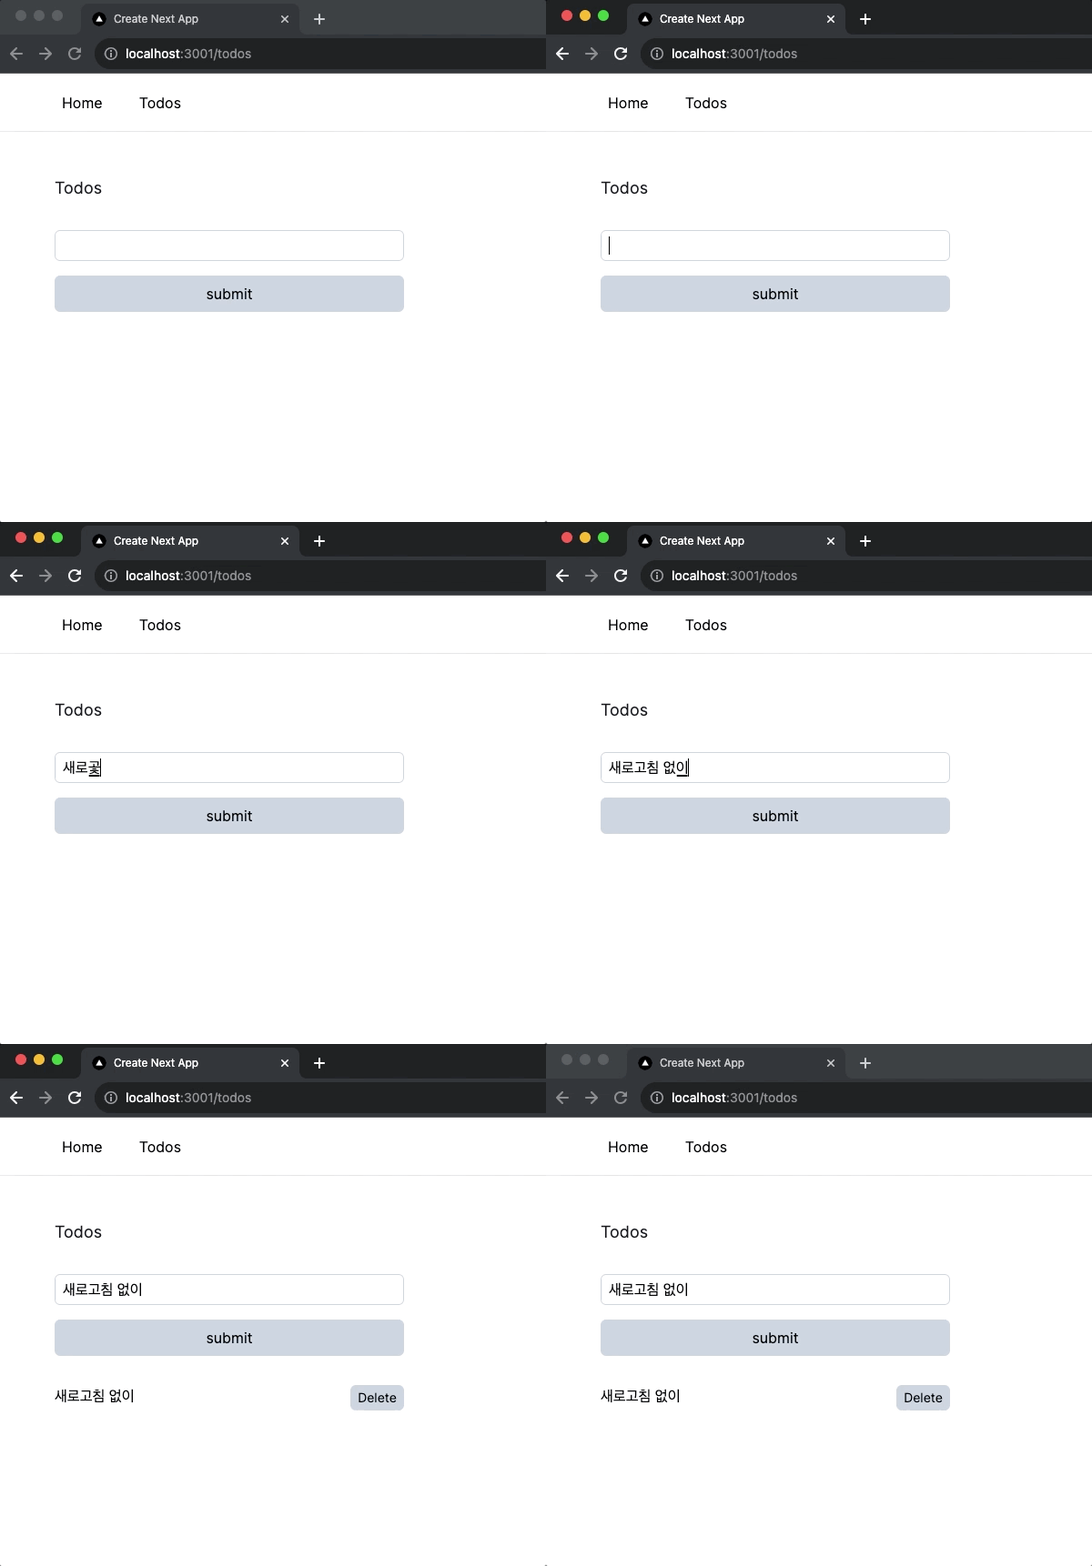
By adding revalidatePath, the data is revalidated automatically, so we can see the newly added todo right away.
2. Let the user know the current state of the form
Right now, the UI gives users no way to tell that the form is loading.
React's experimental hook useFormStatus lets us know the form's loading state.
To use the hook, the component needs to be a client component, so let's split the submit button out into a <SubmitButton /> component.
When creating client components, it's best to make the components at the very bottom of the tree the client ones.
"use client";
import { experimental_useFormStatus as useFormStatus } from "react-dom";

const SubmitButton = () => {
  const { pending } = useFormStatus();

  return (
    <button
      aria-disabled={pending}
      disabled={pending}
      className="rounded-md bg-slate-300 py-2 hover:shadow-sm disabled:opacity-70"
    >
      {pending ? "submitting..." : "submit"}
    </button>
  );
};
export default SubmitButton;
The useFormStatus hook returns the pending state.
Now let's bring the component into the form and try adding a todo.
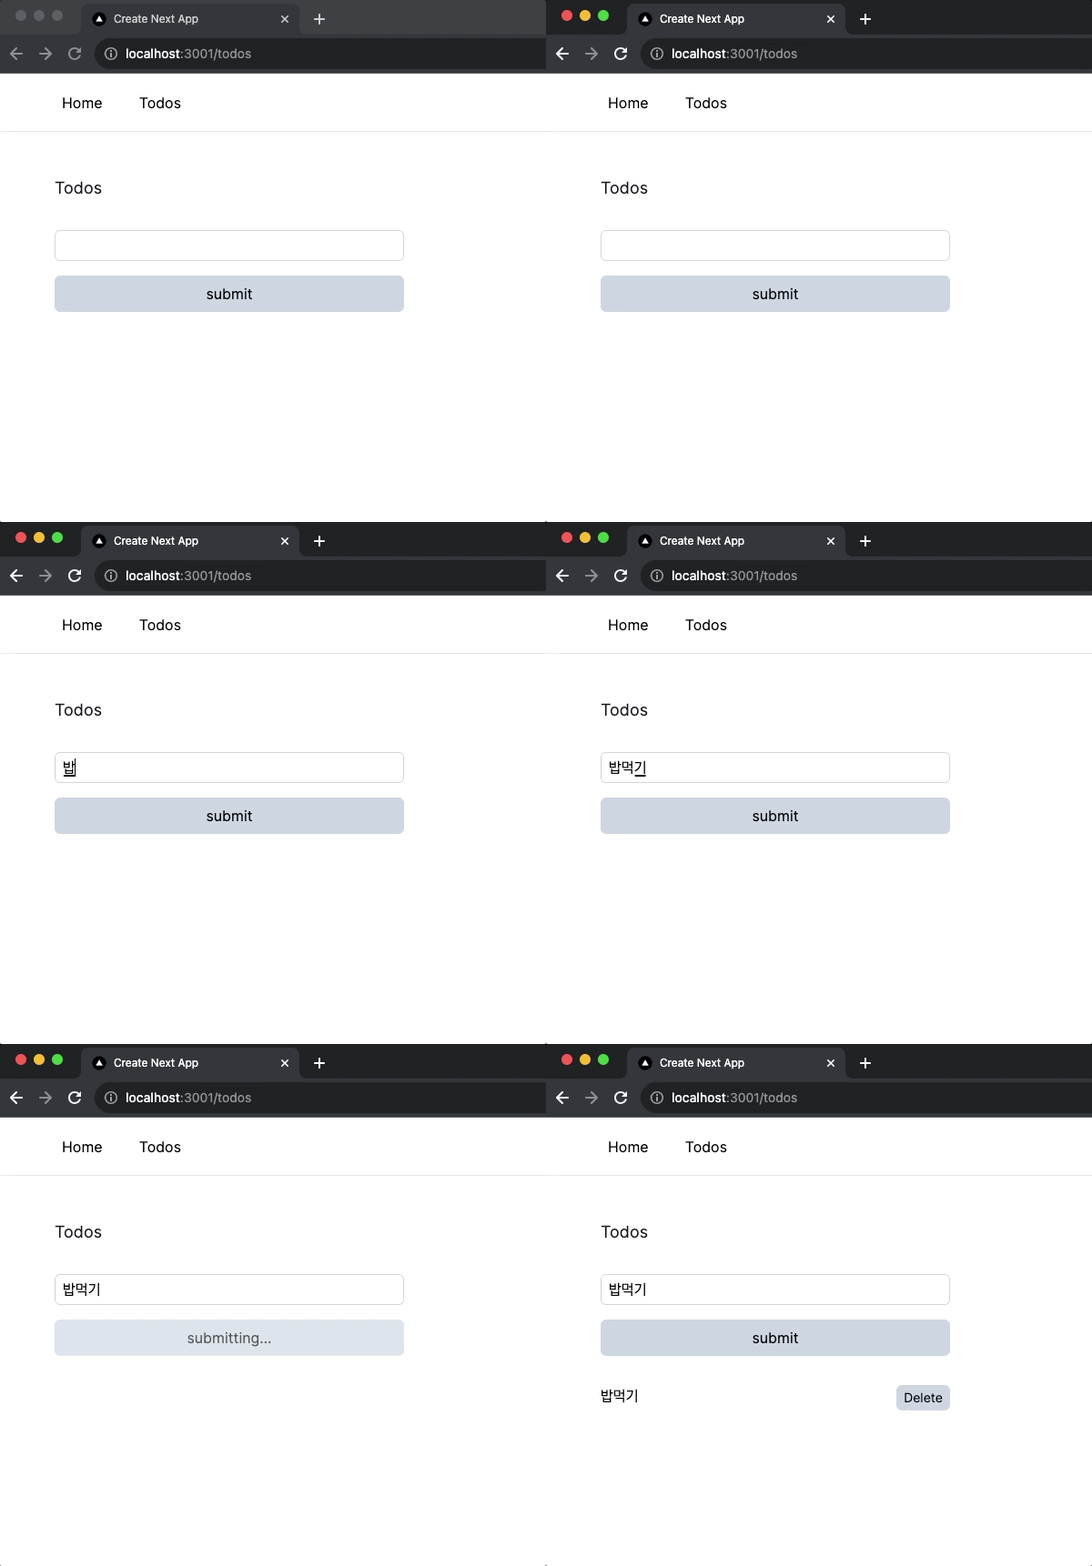
Thanks to pending, we can now tell when the form is being submitted to the server.
The
useFormStatushook can only be used in child elements of a form that uses a server action.
On top of that, you can do error handling with theuseFormStatehook and optimistic UI with theuseOptimistichook.
Advantages of Server Actions
Here are the advantages of server actions:
- Compared to the usual way of handling forms in React, you can handle forms much more concisely.
Server actions let you skip useState and useRef and handle the form with nothing but FormData.
- You can easily tell the loading state.
In regular React, you had to create a loading state yourself and manage it by hand, but with the useFormStatus hook, you can easily tell whether the form is currently being submitted.
- Server actions work even without JavaScript.
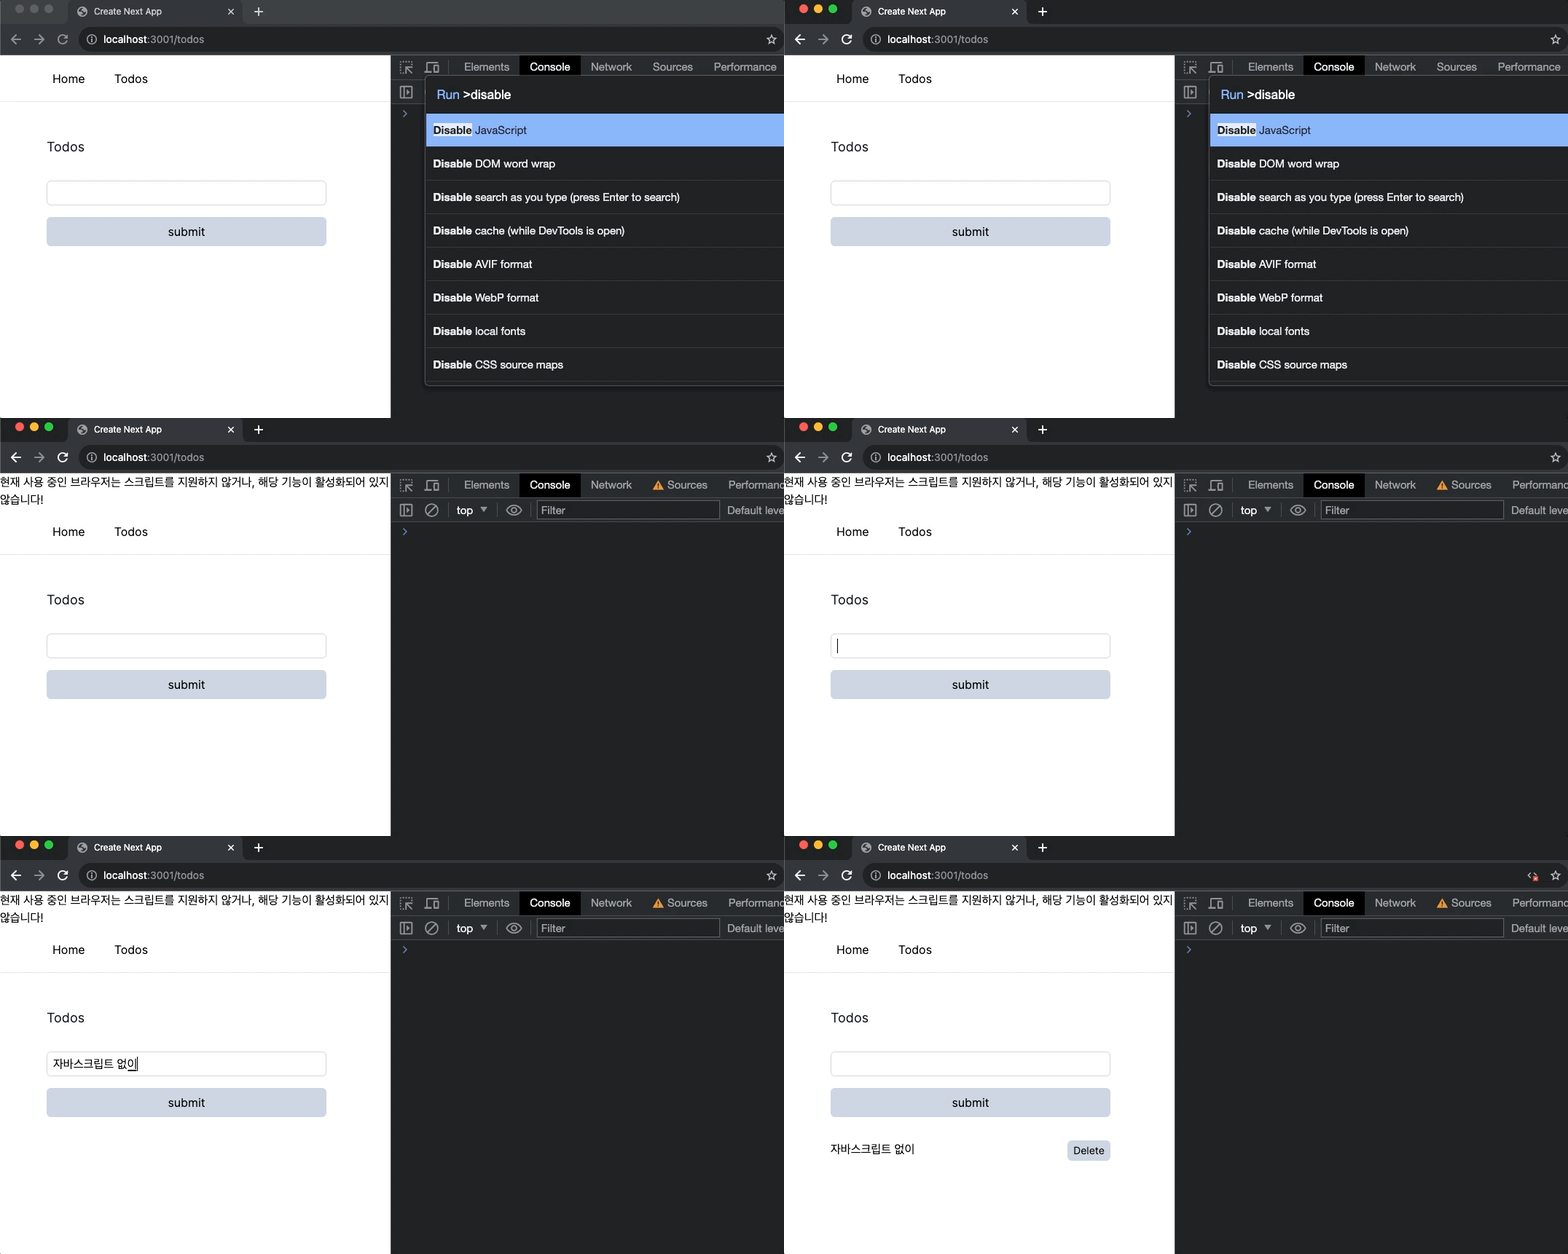
With server actions, you can handle forms more efficiently than the old React way, and loading states and optimistic UI become easy to implement.
Sources