
Overview
I've always been interested in interactive web development, and I got the chance to build the landing page for a conference that needed exactly that kind of thing.
I had been wanting to try Framer Motion, so I decided to use it for this project.
In this post, I'll share what I felt and learned while building the GenCon landing page.
You can check out the actual landing page at gencon2024.fastcampus.co.kr.
What is GenCon?
It's a conference that covers the changes and trends that generative AI (Gen AI) is bringing to the industry, along with how to build datasets and cloud infrastructure for AI services. It's also a place where companies and venture investors share their views on the investment outlook as the AI industry grows.
There were 9 sessions in total, with speakers from global companies like NVIDIA, Microsoft, and GitHub, as well as Korean companies like SNOW and Cox Wave.
The landing page consists of 9 sections, and each section uses scroll- and viewport-based animations, typewriter effects, and more.
I'll walk through how I implemented each animation with Framer Motion, along with the features I built into the landing page.
Scroll-Based Animation
The main section is the first thing users see when they land on the page, so I judged it to be more important than the other sections. Given that importance, we decided during the planning stage to apply a scroll-based animation to boost user immersion. Following the designer's reference, I implemented an animation where the section comes into focus and the title appears as you scroll.
I used the lenis library, which provides smooth scrolling, to give users a more natural scrolling experience.
Here's how lenis is set up:
With an incredibly simple setup, you can give users smooth scrolling.
import { ReactLenis } from "lenis/react";

const RootLayout = ({ children }: { children: React.ReactNode }) => {
  return <ReactLenis root>{children}</ReactLenis>;
};
Now let's look at how to actually control an element's animation based on scroll position.
To do that, you need to use Framer Motion's useScroll hook.
The interface of that hook looks like this:
declare function useScroll({
  container,
  target,
  layoutEffect,
  ...options
}?: UseScrollOptions): {
  scrollX: MotionValue<number>;
  scrollY: MotionValue<number>;
  scrollXProgress: MotionValue<number>;
  scrollYProgress: MotionValue<number>;
};- container: the scrollable container whose scroll position is tracked; defaults to the window viewport
- target: the scrollable area of the container
- options
- axis: the scroll direction; defaults to
"y" - offset: the offset values used to determine scroll progress; defaults to
["start start", "end end"]
- axis: the scroll direction; defaults to
This hook returns motion values that let you control animations based on scroll position.
scrollX/Y: the absolute scroll position on the x and y axesscrollXProgress/YProgress: the relative scroll progress on the x and y axes (0 ~ 1)
To get the focus effect on the screen, I used CSS clip-path.
clip-path is a property that controls an element's clipping region, and you can drive it with the motion values returned by the useScroll hook.
Since the animation needs the scroll progress, I used scrollYProgress.
Here, I used the useTransform hook to convert a motion value into a new value.
The useTransform hook maps a motion value to a new value based on the given input and output ranges.
Its arguments look like this:
useTransform(value, input, output, options);Here's an example of code that uses these two hooks to control an element's animation based on scroll:
const target = useRef(null);
const { scrollYProgress } = useScroll({
  target,
  offset: ["start end", "end end"],
});

const screenStyle: MotionStyle = {
  clipPath: useTransform(
    scrollYProgress,
    [0, 0.9],
    ["circle(200%)", "circle(0%)"],
  ),
};
In the code above, screenStyle is a style object that controls the element's clipPath based on scroll progress.
If you pass this style object to a motion component through its style prop, you can control the element's animation as the user scrolls.
// ...

<div className="App" ref={target}>
  <motion.div className="screen" style={screenStyle}>
    Clipping Test
  </motion.div>
</div>
Typewriter Animation
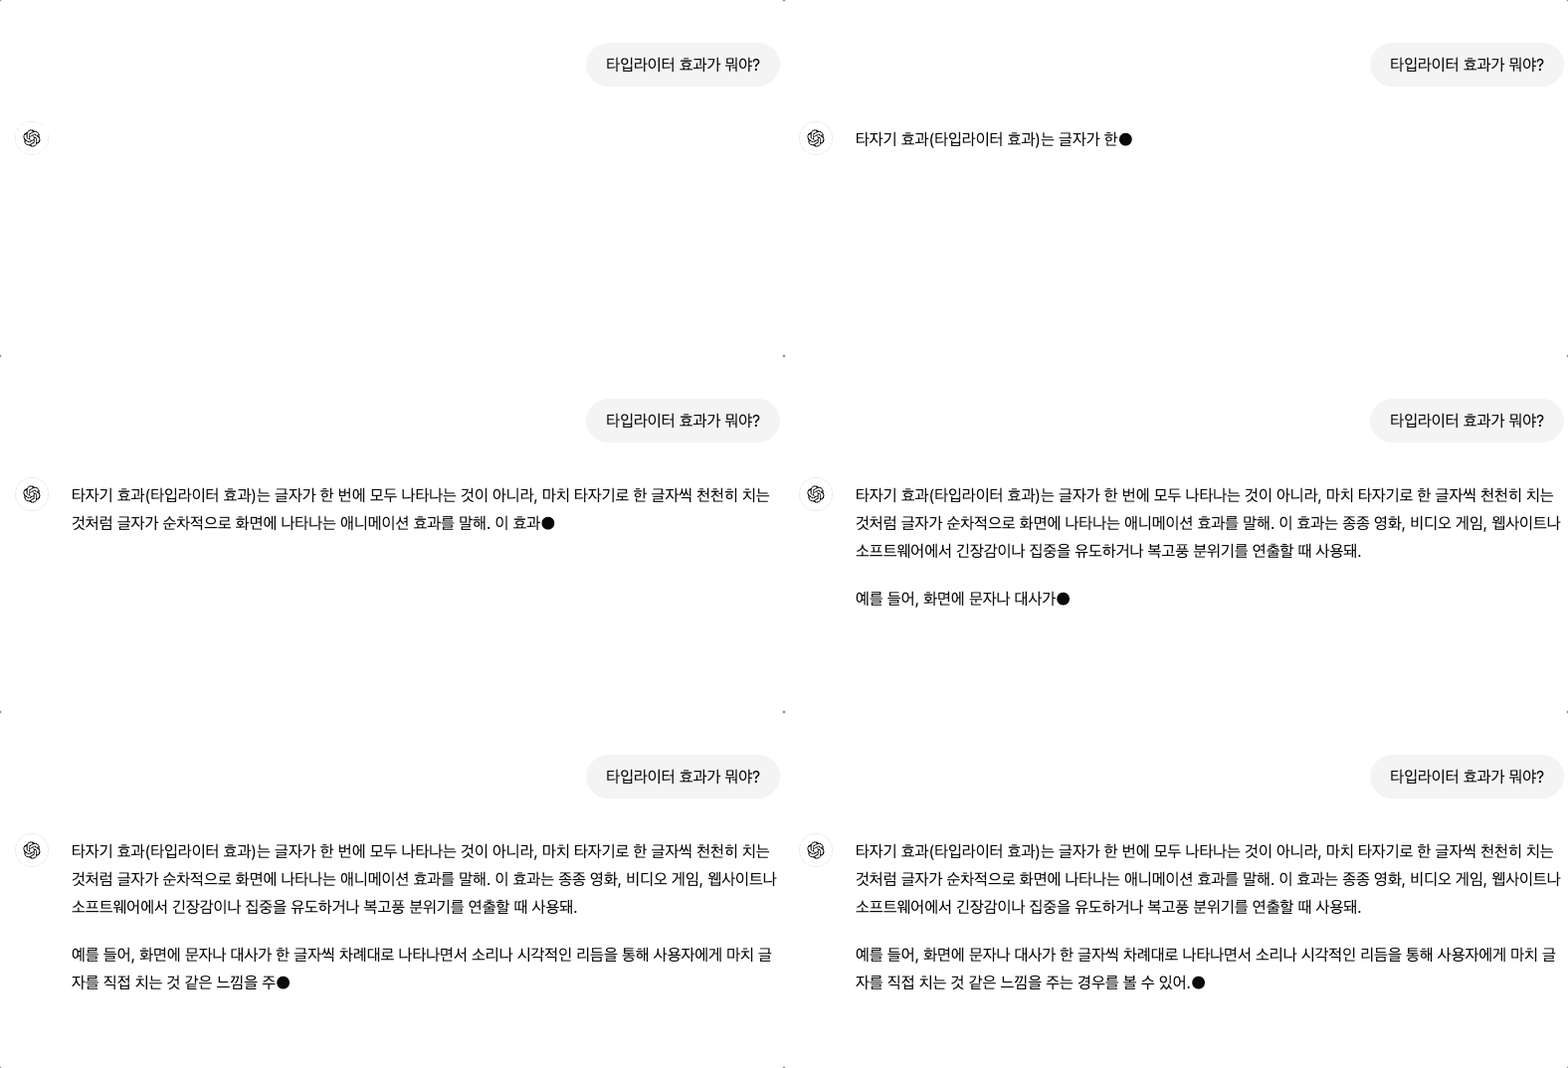
Looks like it, huh? 🤔
The typewriter effect is an animation where text appears one character at a time. It's been popping up a lot lately in conversational AI services like ChatGPT, and it gives users a natural, chat-like experience. Since this conference was all about AI, we decided to use the typewriter effect.
First, I thought hard about how to design the typewriter component. I decided to make it as reusable as possible. To get there, I gave the typewriter component the following interface:
- To inherit the attributes of an existing
HTMLElement, it usesFramer Motion'sHTMLMotionProps - It's a polymorphic component with an
asprop so the tag can be changed flexibly- Polymorphism is an object-oriented programming principle that lets you create many classes from a single interface or abstract class.
- With the
asprop, you can keep the same logic while using the component as various HTML tags. - Here, the
asprop is a union type for type safety.
- A
textprop that receives the actual text for the typewriter
A typewriter component designed this way can be written like this:
type TypewriterTags = "p" | "span" | "div" | "h2";

interface TypewriterProps extends HTMLMotionProps<"p"> {
  as?: TypewriterTags;
  text: string;
  className?: string;
}

export const sentenceVariants: Variants = {
  visible: { transition: { staggerChildren: 0.025 } },
};

export const charVariants: Variants = {
  hidden: { opacity: 0 },
  visible: { opacity: 1, transition: { opacity: { duration: 0.1 } } },
};

const renderCharacters = (text: string) =>
  Array.from(text).map((char, i) => (
    <motion.span key={`${char}-${i}`} variants={charVariants}>
      {char}
    </motion.span>
  ));

const Typewriter = ({
  as = "h2",
  text,
  className,
  ...props
}: TypewriterProps) => {
  const MotionComponent = motion[as] as React.ElementType;

  return (
    <MotionComponent
      variants={sentenceVariants}
      initial="hidden"
      animate="visible"
      className={className}
      {...props}
    >
      {renderCharacters(text)}
    </MotionComponent>
  );
};
The motion component's variants prop is an object that defines the animation's states.
You can predefine various states in it, like initial, final, and hidden states.
This makes it easy to manage complex animation states.
If you want the typewriter component to run its animation when it enters the viewport, you can use Framer Motion's useInView hook.
You reference the target element through a ref, and amount decides how much of the element must be visible in the viewport before the animation runs.
You can also use the once option to set whether the animation should run only once.
import { useInView } from "framer-motion";
import { useRef } from "react";

const useInViewAnimation = (amount = 1) => {
  const ref = useRef(null);
  const isVisible = useInView(ref, {
    amount,
  });

  return { ref, isVisible };
};
export default useInViewAnimation;This typewriter appears based on the viewport. The animation starts once the element comes into view. Try scrolling! 🤘 It's also rendered as a p tag through the `as` prop.
Implementing Modals with URLs Using React Router DOM
Each session provides its details through a modal. You could build the modals without URLs, but by giving them URLs, users can share session info and manage their browsing history.
First, I create a router object with the createBrowserRouter function.
This landing page doesn't need any separate routes, so I use the / path.
I define the shared layout and set up the paths through nested routing with children.
import { createBrowserRouter } from "react-router-dom";

const router = createBrowserRouter({
  element: <RootLayout />,
  children: [
    {
      path: "/",
      element: <App />,
      children: [
        {
          path: "/session/:id",
        },
      ],
    },
  ],
});const Session = () => {
return (
<ul>
{sessions.map((session) => (
<li key={session.id}>
<Link to={`/session/${session.id}`}>{session.title}</Link>
</li>
))}
</ul>
);
};I render the session list with <Link /> components, so that clicking one opens that session's modal.
I used the useParams hook to grab the id from the URL parameters, so the modal can render the info for the session matching that id.
Retrospective
I was really happy that I got to take on the project and communicate directly with the design team, which meant I could get feedback quickly. In particular, I was able to actually build things like interactions and video that I'd always been interested in but never had the chance to implement, and that scratched a long-standing itch. I loved being part of the process where the conference's planning and design came together into a single result, and it was fascinating to watch a design turn into a finished product firsthand. I hope this kind of direct collaboration with the design team continues going forward.
That said, since we mostly communicated online, there were parts of the interaction and mobile design guidelines that I didn't fully understand, and that was a shame. I also regret treating development and design as separate things while I was building. Other regrets: I didn't set aside enough QA time to raise the project's polish, I didn't ask my teammates for help because I wanted to build everything myself, and I didn't keep sharing progress consistently.
In the end, I should stop thinking of design and development as independent and see them as a single organism, and I should try communicating face to face, not just online. I also felt that it's important to keep sharing progress so that my teammates and I are looking at the same timeline.
I think the landing page helped bring in around 1,000 attendees. 😎
On top of that, I also built a survey feature to boost event engagement and participation.
Sources